
Trick or Treat! The Gingerbread Cookie just got a little spooky by becoming Mummies and Skeletons thanks to some fun Halloween decorating ideas! This is a classic Gingerbread recipe interpreted by Martha Stewart and decorated with a fun twist just in time for the Halloween season. Now I don’t have kids, but I sure did have a blast decorating these and I think it’s safe to assume that kids would enjoy this as well!
Martha’s original recipe makes 24 cookies, however I cut mine in half. If you’d like to make 24 cookies, simply double all of the ingredient quantities below.
Prep Time: 10 minutes // Inactive Time: 1 hour // Cook Time: ~10 minutes // Yield: 12 cookies
Gingerbread Ingredients:
- 3 cups flour
- 1/2 tsp baking soda
- 1/4 tsp baking powder
- 1 stick unsalted butter
- 1 cup brown sugar (light or dark)
- 2 tsp ground ginger
- 2 tsp ground cinnamon
- 3/4 tsp ground cloves
- 3/4 tsp salt
- 1 large egg
- 1/2 cup unsulfured molasses
Royal Icing Ingredients:
- 2 egg whites
- 1-2 tsp milk (adjust according to consistency)
- 3 cups powdered sugar
- Food coloring *optional
- Edible glitter dust *optional
- Whisk together the flour, baking soda, baking powder, the spices and salt in a large bowl and set aside.
- Cream the butter and sugar together until light and fluffy in a stand mixer. Add in the egg, mixing until well-combined, followed by the molasses.
- Slowly add the dry ingredients in part, folding into the wet ingredients until well-combined and dough forms. Pat the dough into a disc and place on plastic wrap to refrigerate for 1 hour.
- For the Royal Icing, whip the egg whites until they are light and fluffy, then add the powdered sugar. The consistency should be smooth and shiny. Be sure that it’s not too runny or too thick – if it’s runny add more sugar, if it’s thick add a touch of water or milk until the desired consistency is achieved.
- Determine how many colors you’d like to make, and set aside enough bowls to color your icing/frosting. I stuck to a simple combination of white, with a small batch of green.
- Once the dough has been refrigerated for 1 hour, preheat the oven to 350 and line 2 baking sheets with parchment paper.
- On a lightly floured surface, divide the dough in half or into quarters for ease in rolling out the dough. Roll the dough out 1/8 inch thick and create your cookies using the cookie cutters of your choice (I’m using traditional gingerbread people). As you cut out your cookies, place them onto a baking sheet. Continue this process until the dough is gone and you’ve filled ~2 baking sheets (might be more or less depending on the size of your cookie cutter).
- Bake for 10 minutes, if you’ve left your cookies on the thick side, add a few extra minutes to the bake time. The cookies should be slightly crisp, but not darkened.
- Remove from the oven and allow the cookies to cool while you gather the rest of your decorating supples – piping bags, decorating tips (tiny ones), food coloring, non-perils, edible glitter, etc.
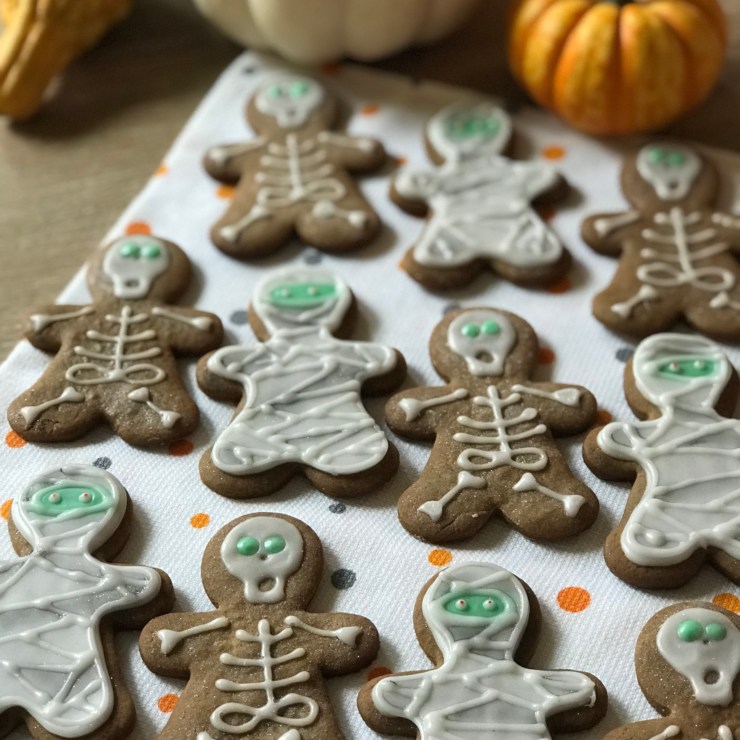
- Start with the Gingerbread Mummy design by adding a green oval shape where the eyes of the Gingerbread Mummy would be. Next, begin piping an outline around the cookie and the green oval you just created with the white icing, then fill the entire cookie in with the white Royal Icing. Set the Mummy cookies aside to allow the icing to harden.
- For the Gingerbread Skeleton, pipe an outline of the skull, leaving 2 holes for the eyes, a hole for the nose, and a hole for the mouth. Then pipe the remaining bones throughout the body and set aside.
- Return back to the Mummy design if the icing has hardened by piping another thin outline of white icing around the green oval and the edge of the cookie, then start creating lines overtop to create a “wrapped mummy” look. At the end, pipe 2 very small dots in the green oval to represent “eyes”. Allow the eyes to harden, then you can take a toothpick and dip it in red food coloring and very gently dot the top of the white “eyes” to create a spooky-red pupil in the eye.
- Lastly, going back to the Skeleton cookie after the icing has hardened and using your green icing to pipe 2 small dots into the “eye sockets” to represent eyeballs. Feel free to take your own creative liberties throughout the decorating process! Make these Gingerbread Mummies and Skeletons your own! 🙂 If you have any other special touches such as edible glitter, you’ll want to dust this over your cookies when the icing has dried. Anything that you want to stick into the icing should be placed on when the icing is still wet.
Enjoy, but most importantly – have fun with this one! Happy Halloween!


Follow me on Instagram for more adventures in yummy goodness @bakingwithsoul

[…] 3D gingerbread cookie decor as I did (photos below), check out my quick and easy gingerbread recipe here. I recommend cutting the recipe in half or into thirds if you are only using the cookies for decor. […]
LikeLike