This year post Croatian Christmas Cooking baking day, I’m probably the most excited about this cookie, Madarica! If you haven’t read my previous post yet, give it a quick read for insight into this lovely family tradition and what it has in store for this year!
Madarica was a new Croatian cookie that I have never tried before, so it was a new baking adventure for mom and I. In Croatian, this translates to “Hungarian Lady” as the recipe was brought over from a Hungary Lady and therefore the name stuck. They are also called “Hungarian Squares”
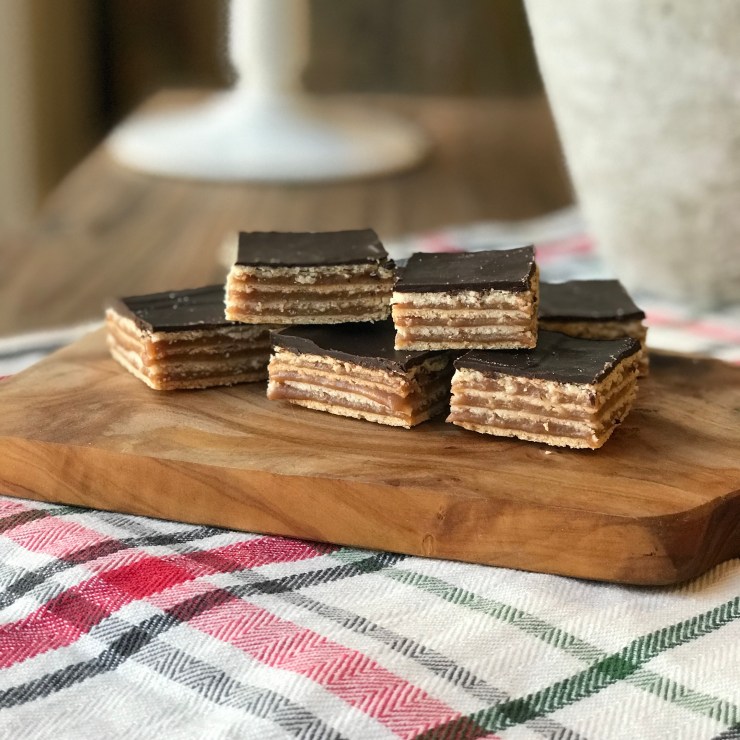
These layered cookie squares can be super challenging when it comes to assembly however. Baking and assembling these cookies takes time and A LOT of patience! This is primarily because of the very thin layers of dough that is baked then needs to be handled to assemble. Since the dough is so thin it can crack or break very easily, then once assembled, cutting the dessert into squares is a whole other practice in patience. I promise I’m not trying to scare you off from giving these a try 😉 they are SO well worth it! Just be sure to give yourself additional time for proper cooling of the layers, assembly, then cutting of the squares, and you’ll be just fine! I’ve included the exact steps that I used, along with timing, and mine came out wonderfully.
I think these Madarica squares will be a new permanent addition to our tradition because they are so amazing… they have a hint of sweetness with a lovely balance from the dark chocolate layer, and a wonderfully balanced texture as well. Lets get to this amazing recipe! This recipe comes from my Croatian cookbook – “The Best of Croatian Cooking”. It has all sorts of appetizer, entree, dessert recipes and more so I highly recommend!
Dough Ingredients:
- 3 1/4 cups flour
- 1 tsp baking powder
- 2 sticks unsalted butter
- 1 cup sugar
- 2 eggs
- 3 tbs sour cream
Filling Ingredients:
- 1 1/2 cups sugar
- 2 cups milk
- 1/2 cup flour
- 1 1/2 sticks unsalted butter
- 1 tbs cocoa
Topping:
- 5 ounces of dark baking chocolate
- Sift together the flour and baking powder into a mixing bowl/stand mixer.
- Cube the butter then add it into the bowl and turn the mixer on low. Then add the sugar, eggs and sour cream and mix together until a dough starts to form. Chill in the fridge for 30 minutes.
- Begin the filling by heating a medium saucepan with 1 cup of sugar on a medium-low setting. Stir until sugar starts to caramelize, then add the milk and continue stirring to avoid the mixture burning. Adding the milk may cause the mixture to seize up, but just keep stirring and it will smooth out. Remove from the heat when the mixture starts to thicken and allow to cool.
- Whip together the butter with the remaining 1/2 cup of sugar and cocoa. Mix into the cooled caramelized sugar mixture.
- Preheat the oven to 375 and remove the dough from the fridge. Divide dough into 4 equal balls and roll each ball out separately on a lightly floured surface into a rectangular shape. The dough should be rolled thin.
- Lightly grease the back of a 9×13 baking sheet and place 1 rolled out dough section on top and bake one at a time for 12-15 minutes. The dough should hang over the sides of the baking sheet as it will shrink during baking. As each layer finishes baking, allow them to cool then transfer them to a wire rack to continue cooling as the remaining layers bake. Allow a minimum of 1 hour for all layers to cool before attempting assembly. This means some layers will have cooled for a lot longer and that’s completely fine!
- To assemble, divide the filling up into 3 equal parts. Place the first layer of baked dough on the bottom of a new baking tray and spread 1/3 of the filling lightly and evenly over the entire dough. Then place the second layer of dough overtop, followed by a second layer of filling. Same goes for the third layers, then you will place the final baked dough layer on top of the final filling layer, pressing down very gently.
- In a microwave or double-boiler, melt your chocolate squares (add a little oil or cream if needed for shine) then pour the melted chocolate overtop the final dough layer. Working carefully and quickly to spread the chocolate layer evenly over the dough.
- Once assembly is complete, place in the fridge overnight. This allows the dessert to continue cooling, however it will also make the layers more stable and easier to cut. When you’re ready to cut the squares, remove from the fridge and allow it to warm up to room temperature for an hour or two, then very slowly and carefully, take a very sharp, smooth knife and begin to trim the edges of the dessert. Once the edges are trimmed, first cut the dessert into long horizontal rows before cutting into squares. Once your squares are complete, return the cookie squares back into the fridge until ready to serve!
Enjoy these delightful little chocolate squares! P.S. they taste great with coffee 🙂

Follow me on Instagram for more adventures in yummy goodness @bakingwithsoul

Just loved it 🙂
LikeLiked by 1 person
Love these perfectly layered squares ! Kudos for all your hard work & patience !!
LikeLiked by 1 person
Thank you Megala!! Lots of it 😂😂
LikeLiked by 1 person
These look amazing. A must try.
LikeLiked by 1 person
Thank you Cathryn!
LikeLike
[…] Madarica (Hungarian Layered Squares) […]
LikeLike
[…] Madarica (Hungarian Layered Squares) […]
LikeLike
[…] Madarica (Hungarian Layered Squares) […]
LikeLike
Mađarica is one of my favourite cakes, the best thing about it is that you can find it anywhere in Zagreb, Croatia 🙂
LikeLike
[…] Madarica (Hungarian Layered Squares) […]
LikeLike
[…] Madjarica (Hungarian Layered Squares) […]
LikeLike